In our first article, "Blockchain Interoperability Explained: Bridges, Cross-Chain Protocols, and CCIP," we introduced the concept of bridges and the different ways to bridge a token between chains. In this second article, we will delve deeper technically and present a procedure to use CCIP as a bridge to exchange USDC tokens between Polygon and Avalanche.
First, to interact with the CCIP bridge, you have several options:
1. You can use Transporter, which is a GUI app by Chainlink.
2. Directly send your instructions to Chainlink’s router contract.
3. Interact through a sender contract.
We’ll explore the second and third options. For the third option, we released our sender contract on GitHub.
The tests have been carried out with our product Taurus-CAPITAL, a platform to deploy and manage smart contracts, as well as Taurus-PROTECT, our custody solution.
The different graphs and UML diagrams have been created with the Visual Studio Code extension Solidity Visual Developer and the tool Surya.
Main contracts
The router contract
The router contract, deployed on each supported blockchain by Chainlink, is in charge of sending and receiving messages between each side of the bridge.
As an end user, if you interact with the router directly, you have to:
-
Correctly encode the message
-
Hold fee tokens to pay the bridge
-
Be sure that the tokens or dApp on the destination chain authorize this call.
For a dApp or a token provider, you may want to offer more customization for token holders, for example, by paying the fees for your users or allowing the user to pay in a token not supported by Chainlink. In this case, the preferred way is to deploy a sender contract, which serves your user as the main entry point.
The function to call is ccipSend(). This takes as argument the destination chain selector and an EVM2AnyMessage message:

From Chainlink CCIP, commit a75966095e93a97e0ed181cda6fabaac137e0ef1
The EVM2AnyMessage struct contains the following fields, including the receiver and data for the destination chain (data being empty for a simple transfer):

From Chainlink CCIP, commit a75966095e93a97e0ed181cda6fabaac137e0ef1
Here tokensAmount is an array of EVMTokenAmount elements, where the EVMTokenAmount struct consists of two fields, the token contract and the amount to transfer:
 From Chainlink CCIP, commit a75966095e93a97e0ed181cda6fabaac137e0ef1
The sender contract
The sender contract serves as an entry point between your end user and the router contract from Chainlink. This contract is under your control and can be used to offer more customization possibilities. It will be the primary entry point to bridge tokens and will contain all the logic to transfer tokens and send messages.
USDC bridging setup
The reference for this section is the Chainlink documentation.
On the source blockchain
When a user calls the transfer() function from the sender contract:
-
The function ccipSend() from the router is called, including as EVM2AnyMessage a message defined by the sender contract.
-
The router calls the contract OnRamp Chainlink contract to get the USDC pool address and compute the fees.
-
If the sender contract’s balance is enough to cover the fees, the tokens are transferred to the pool; otherwise, the transaction is reverted and the process aborts.
-
The USDC pool calls Circle’s CCTP contract to burn the transferred USDC tokens. The pool indicates also which address is authorized to mint tokens on the destination chain, in this case, the USDC token pool on the destination chain.
These steps occur within the same transaction. If an error arises during the token transfers to the pool by the router, the transaction is reverted.
The sender contract
The sender contract serves as an entry point between your end users and the router contract from Chainlink. This contract is under your control and can be used to offer greater customization possibilities. It will be the primary entry point to bridge tokens and will contain all the logic necessary to transfer tokens and send messages.
USDC bridging setup
The reference for this section is the Chainlink documentation.
On the source blockchain
When a user calls the transfer() function from the sender contract:
-
The function ccipSend() from the router is called, including as EVM2AnyMessage a message defined by the sender contract.
-
The router calls the contract OnRamp Chainlink contract to get the USDC pool address and compute the fees.
-
If the sender contract’s balance is enough to cover the fees, the tokens are transferred to the pool; otherwise, the transaction is reverted and the process aborts.
-
The USDC pool calls Circle’s CCTP contract to burn the transferred USDC tokens. The pool also indicates which address is authorized to mint tokens on the destination chain: in this case, the USDC token pool on the destination chain.
These steps occur within the same transaction. In an error arises during the token transfers to the pool by the router, the transaction is reverted.
Off-chain
Events on the source chain are monitored by two components:
-
The Circle Attestation Service listens to CCTP events, enabling it to confirm when tokens have been burned by the USDC pool.
-
The CCIP Executing DON listens to relevant CCTP events. It will also recognize the burn action and call the Circle Attestation Service's API to request a signed attestation.
This attestation is necessary to mint the specified amount of USDC on the destination blockchain.
On the destination blockchain
The Executing DON provides the attestation to the OffRamp contract.
The OffRamp contract calls the USDC token pool with:
-
The USDC amount to be minted
-
The Receiver address
-
The Circle-signed attestation
The USDC token pool calls the CCTP contract, which verifies the attestation signature before minting the specified USDC amount into the Receiver.
Build a sender contract
This section presents an example of a sender contract. There are several points to consider when building a sender contract:
-
Which end user is authorized to use the contract?
-
Which blockchain is supported?
-
Which fees are supported by the bridge (e.g., native tokens, LINK, other ERC-20)?
-
How are public functions protected in terms of access control?
Modules
We divided the code into several modules, each responsible for a specific task.
|
Group |
Contract name |
Description |
|---|---|---|
|
|
CCIPSender |
Our main contract to deploy. |
|
|
CCIPBaseSender |
Our base contract providing the public transfer functions. |
|
Security |
|
|
|
|
AuthorizationModule |
Manage the access control. |
|
Wrappers |
|
|
|
|
CCIPSenderBuild |
Build a CCIP message. |
|
|
CCIPContractBalance |
Manage contract balance in native token and ERC-20. |
|
Configuration |
|
|
|
|
CCIPAllowlistedChain |
Set and define the blockchain supported by the sender contract. |
|
|
CCIPRouterManage |
Store the router contracts address and associated functions. |
|
|
CCIPSenderPayment |
Compute fee required to transmit the transfer message. |
CCIPSender
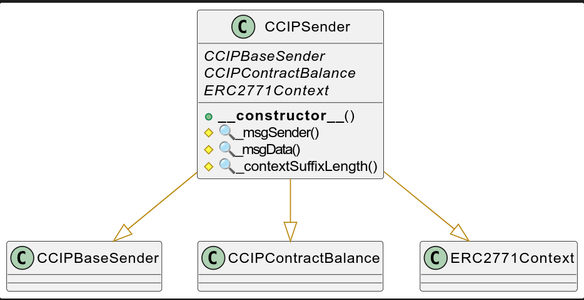
UML
AuthorizationModule
This section explains the different roles used. Each role is defined in the specific module AuthorizationModule.
The sender contract has to be protected by access control. In our proof of concept (PoC), we have the following roles:
|
Role name |
Description |
Module |
|---|---|---|
|
BRIDGE_USER_ROLE |
This role can transfer tokens through the bridge. |
CCIPBaseSender |
|
DEFAULT_ADMIN_ROLE |
This role has all the roles and by default manage all the different roles. |
|
|
BRIDGE_OPERATOR_ROLE |
Can set the different authorized payment. |
CCIPSenderPayment |
|
BRIDGE_ALLOWLISTED_CHAIN_MANAGER_ROLE |
Can manage the different chain allowed by our bridge. |
CCIPAllowlistedChain |
CCIPBaseSender
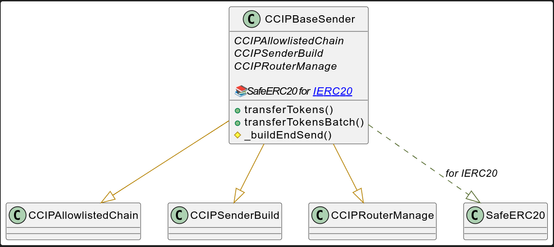
UML
Transfer Token
The function transferToken() is used by end users in order to transfer their tokens.
In our contract, we have restricted the function to only authorized users through the OpenZeppelin access control. This protection is here to avoid an external attacker by emptying the fee token.
To open your sender contract to external, two solutions can be implemented:
-
Make the function payable and use the payment by the user to pay the fees.
-
Add another function, e.g., depositLinkToken() to authorize a user to perform a deposit on the contract and keep a registry inside the smart contract with the amounts deposited for each user.
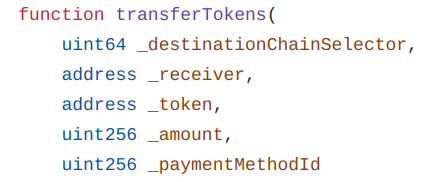
In the below graph, you can observe the flow between the different functions:
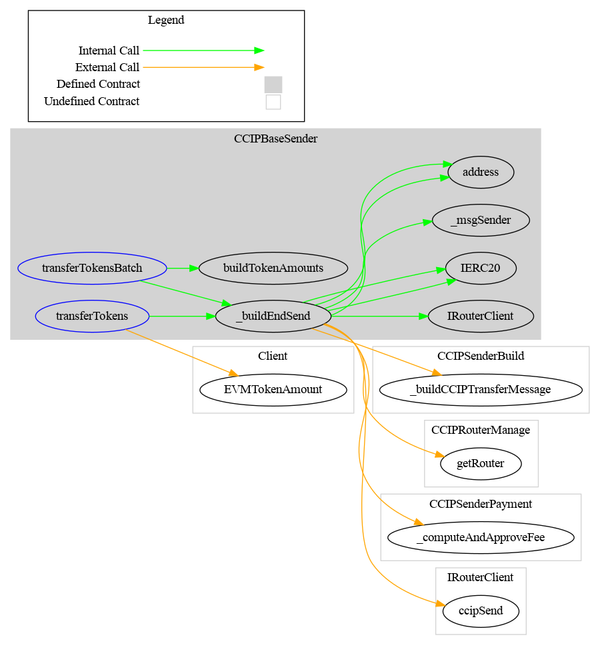
Made with Surya
Steps
In our proof of concept, the function performs the following steps:
-
Build an EVMTokenAmount which contains, for each token, the amount to transfer.
-
Build an EVM2Anymessage by calling the internal function _buildCCIPTransferMessage().
-
Call the function _computeAndApproveFee() from CCIPSenderPayment().
-
Get the fee from the router.
-
Check if the contract balance is enough to pay the fees; otherwise, revert.
-
Fee:
-
If the fees are paid in an ERC-20 token, approve the router to spend the fees on the contract’s behalf.
-
In the case of native token, this is done by passing value in the call to the router since the concept of approval does not exist for native tokens.
-
-
-
Token transfer and approval
-
Transfer the tokens from the user to the sender contract.
-
Approve the router contract to transfer the tokens on the contract’s behalf.
-
-
Send the CCIP message through the router.
-
Emit event.
CCIPContractBalance
This contract is responsible for managing the contract’s balance in native token and ERC-20.
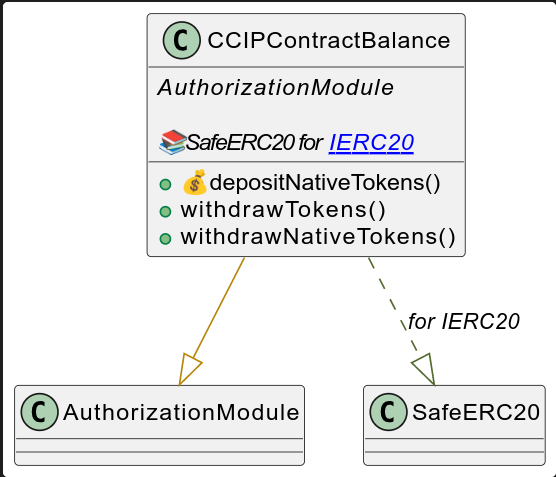
UML
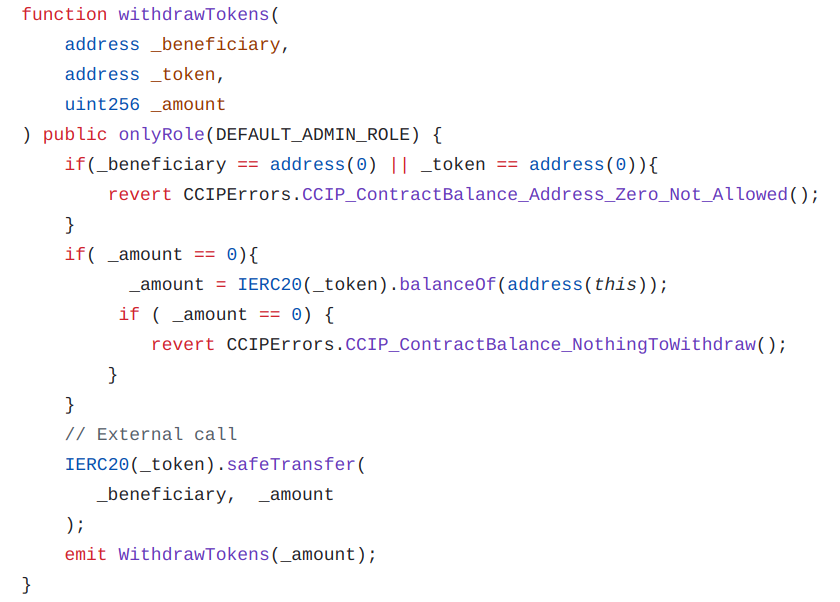
Since fee tokens are sent to the contract, you should include in your sender contract a function withdrawTokens to retrieve the tokens put in your sender contract.
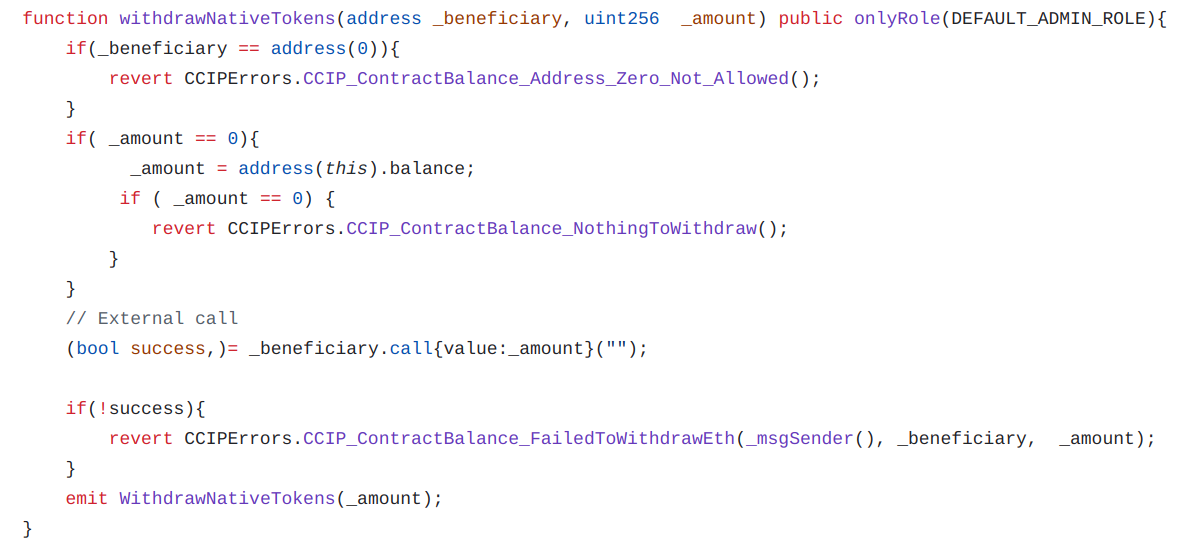
Since our sender contract allows payment of fees in native tokens, we have also added a function to retrieve native tokens.
Example: To withdraw 1 MATIC from our contract:
Taurus-CAPITAL
Example: To withdraw the entire contract balance:
Taurus-CAPITAL
CCIPSenderPayment
This contract is responsible for managing the fee computation.
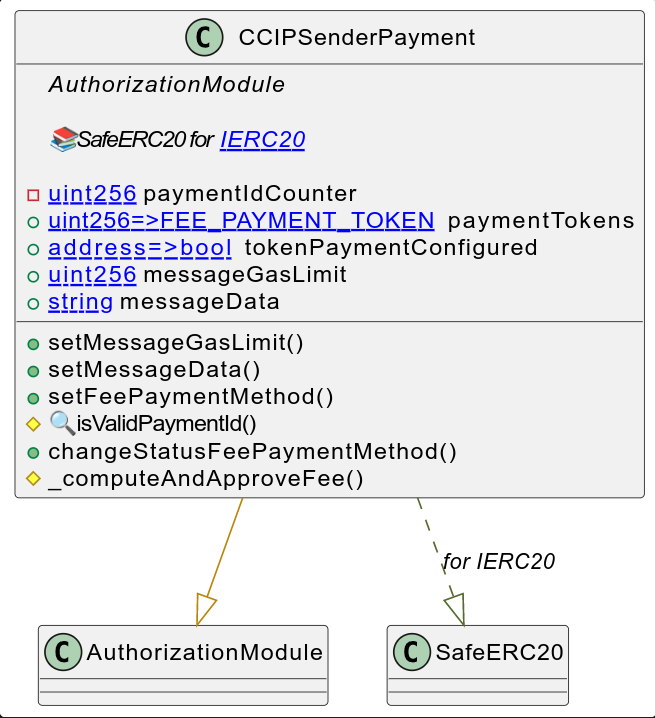
UML
In some blockchains, CCIP allows several different tokens, in addition to the native token, to pay the fees. To have the most flexibility, the different payments available are added by the bridge operator who defines the token address. Each fee token is identified by a unique ID passed by the end user to the public transfer function. Since the native assets of the blockchain do not have an associated contract, they have by default the ID zero with the address zero.
- setFeePaymentMethod()

- changeStatusFeePaymentMethod()
The module also offers an internal function _computeAndApproveFee() which computes the fees by calling the router contract and directly approves the right amount.
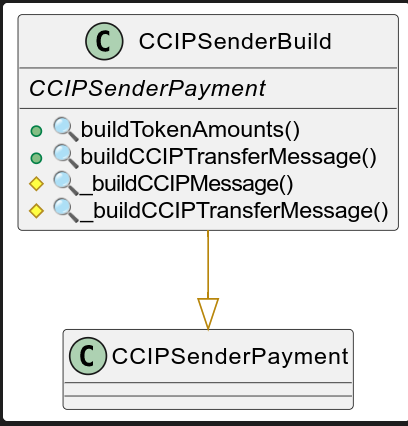
CCIPSenderBuild
This contract is responsible for building the message in the CCIP format.
UML
A CCIP message consists in five parameters, formed as a EVM2AnyMessage strcuture via the _buildCCIPTransferMessage() function:
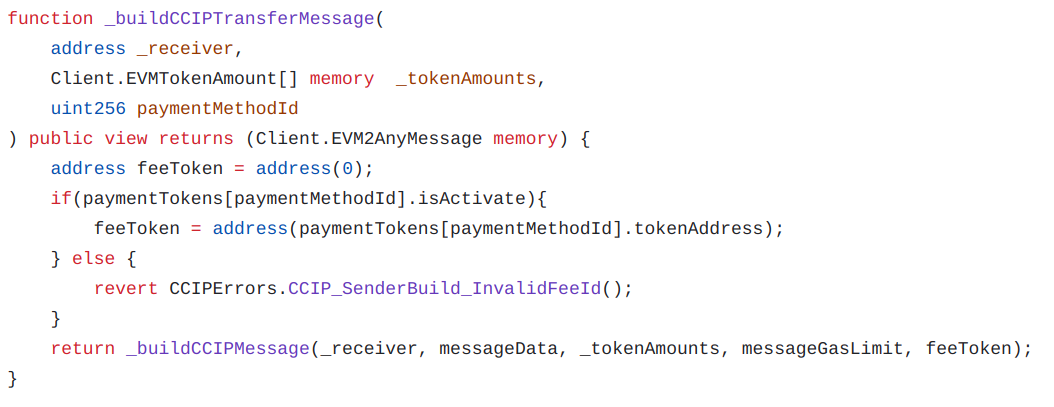
The parameters are defined as follows:
|
Parameter |
Value in the EVM2AnyMessage structure |
Description |
|---|---|---|
|
receiver |
_receiver |
Function parameter, encoded in the ABI format, received from the caller. |
|
data |
Empty |
Empty since we only want to transfer tokens in our case. |
|
tokenAmounts |
_tokenAmounts |
Structure containing the tokens information: token contract address and amounts to transfer, |
|
extraArgs |
Client._argsToBytes( Client.EVMExtraArgsV1({gasLimit: 0}) ) |
A gas limit converted to bytes, based on the messageGasLimitm variable computed in the function. |
|
feeToken |
paymentTokens[paymentMethodId].tokenAddress |
Defined from the paymentMethodId argument. |
The function building a message receives three of these attributes as arguments from the caller, and defines the others, using the Gasless transaction
Our sender contract also implements the standard ERC-2771, which allows to perform “gasless” transaction for the end user. The gas payment is delegated to another party, which is responsible for submitting the meta-transaction on-chain. This meta-transaction has been previously signed by the end user.
Manage transaction failure
What happens if the tokens are locked in the blockchain source, but never delivered in the destination chain due to a transaction failure?
If you are lucky, the transaction could be available for manual execution. In this case, the execution of the transaction on the destination chain can be manually triggered.
If not, you can do nothing apart from contacting the Chainlink support. The tokens have been transferred to the CCIP pool and have been locked or burned. In the best scenario, the token has a function inside that allows the issuer to force a transfer from the pool to your address or burn the locked tokens to mint new ones to your destination.
Example
Configuration
For our PoC, we have used our own product to deploy and interact with our sender contract.
From Polygon to Avalanche, we found in the Chainlink documentation the supported fee tokens and tokens available to transfer.
The test consists of transferring 1 USDC from:
-
Polygon mainnet to Avalanche C-Chain mainnet by paying the fees in MATIC, the Polygon PoS native token.
-
Avalanche to Polygon by paying the fees in LINK, the token emitted by Chainlink.
Smart contracts
This table contains the smart contracts used for the PoC.
|
Blockchain |
Smart contract |
Deployer |
Address |
|---|---|---|---|
|
Polygon ChainSelector: 4051577828743386545 |
|
||
|
|
CCIP router |
Chainlink |
0x849c5ED5a80F5B408Dd4969b78c2C8fdf0565Bfe |
|
|
Sender |
Taurus SA |
|
|
Avalanche ChainSelector: 6433500567565415381 |
|
|
|
|
|
CCIP router |
Chainlink |
0xF4c7E640EdA248ef95972845a62bdC74237805dB |
|
|
Sender |
Taurus SA |
Assets
This table contains all the information regarding the fee payment for the gas and the use of the CCIP, as well as the assets transferred.
|
Blockchain |
Goal |
Tokens |
Address |
|---|---|---|---|
|
Polygon |
|
|
|
|
|
Pay gas fees |
Polygon MATIC |
Native token Polygon |
|
|
Pay CCIP fees |
Polygon MATIC |
Native token Polygon |
|
|
Assets transferred |
USDC Polygon |
|
|
Avalanche C-Chain |
|
|
|
|
|
Pay gas fees |
Avalanche AVAX |
Native token Avalanche |
|
|
Pay CCIP fees |
Avalanche AVAX |
Native token Avalanche |
|
|
Assets transferred |
USDC Avalanche |
References:
https://www.circle.com/en/multi-chain-usdc/avalanche
https://docs.chain.link/resources/link-token-contracts
https://www.circle.com/en/multi-chain-usdc
Deployment
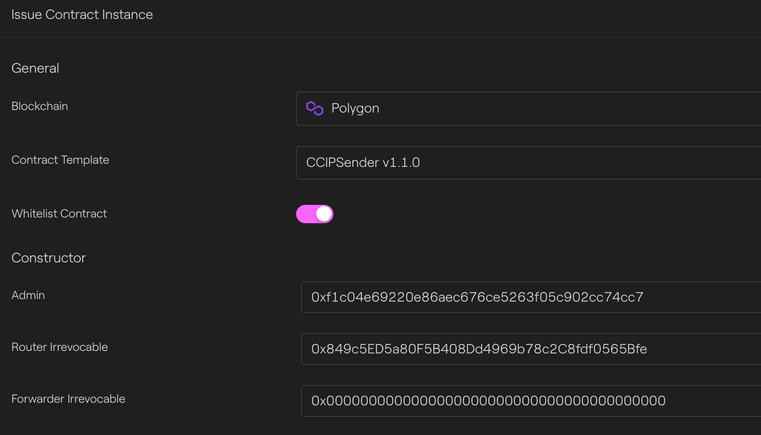
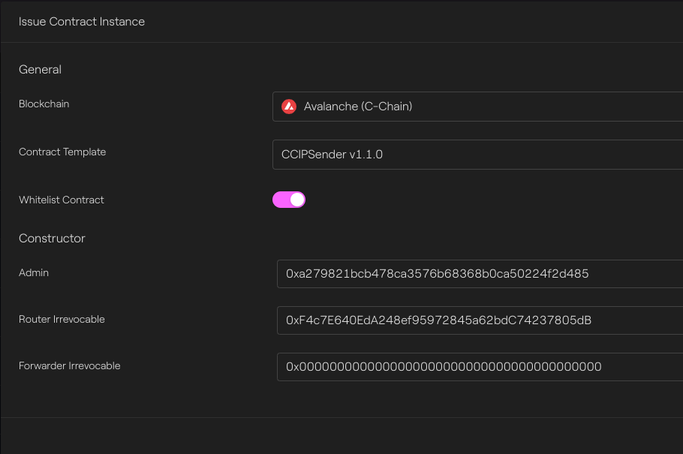
Each sender contract must be deployed on both blockchains, Avalanche and Polygon, to create a bidirectional bridge. After deployment, the first step is to set the link between Polygon and Avalanche. Below, we show excerpts from the GUI of Taurus-CAPITAL.
We first deploy our sender contract on Polygon:
Polygon - Taurus-CAPITAL
Transaction: https://polygonscan.com/tx/0xf6122560470d52f99a5162c5f4ba812148bebe764cbf6dda0db1c51dd6e8d44d
Then we deploy the sender contract on Avalanche:
Avalanche - Taurus-CAPITAL
Configure the sender contract
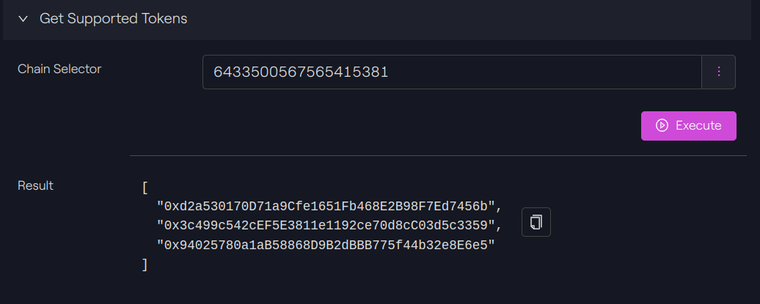
We can call the function getSupportedTokens() to know the list of tokens supported by CCIP
On Polygon, the USDC contract is 0x3c499c542cef5e3811e1192ce70d8cc03d5c3359 and we can see it on the list.
Polygon - Taurus-CAPITAL
On Avalanche, the USDC contract is 0xB97EF9Ef8734C71904D8002F8b6Bc66Dd9c48a6E and we can see it on the list.
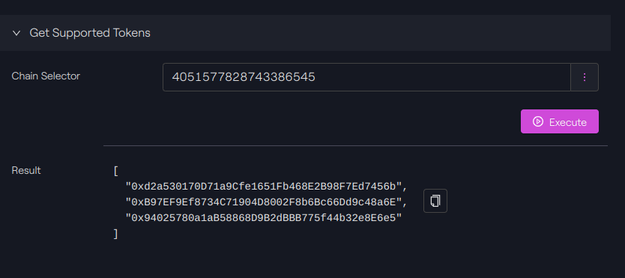
Avalanche - Taurus-CAPITAL
Allowlist chains
We have to configure the list of chains allowed, calling the function setAllowlistChain() to do this:
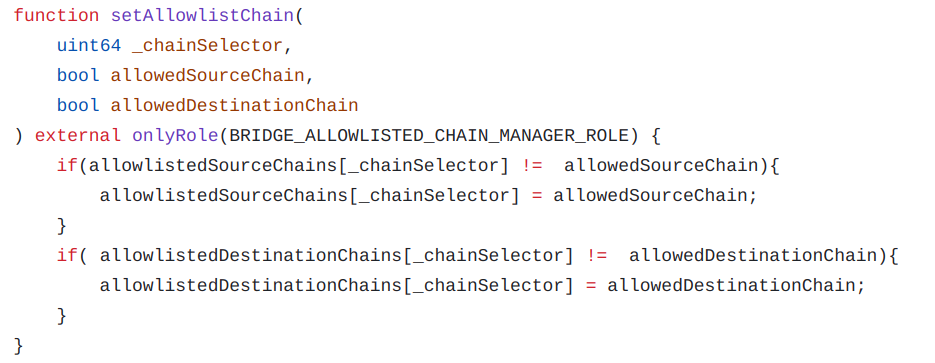
On Avalanche, we will allow Polygon to be a destination chain. We call the function setAllowlistChain() to do this:
setAllowlistChain(4051577828743386545, false, true)
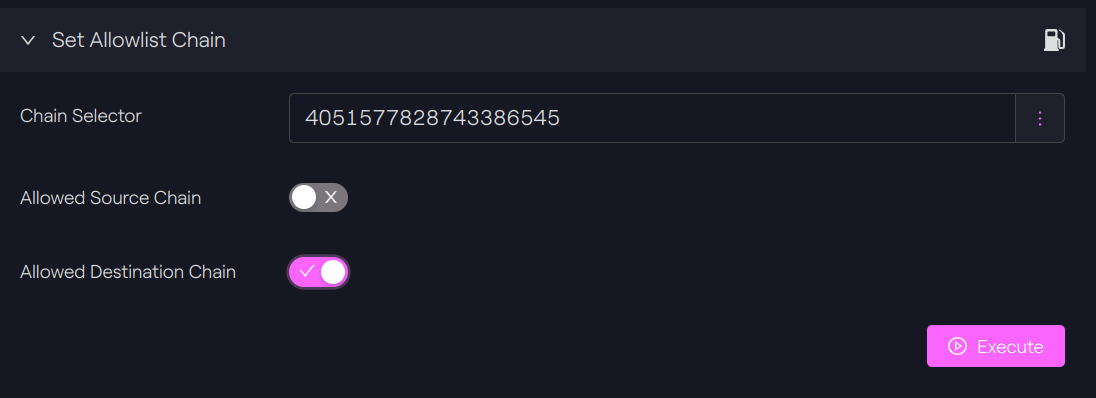
Avalanche - Taurus-CAPITAL
Transaction: 0x479b0c0a4102807b9c83d656e7b13d8a6de3247639b05c1d52838eb863630019
On Polygon, we allow Avalanche to be a destination chain:
setAllowlistChain(6433500567565415381, false, true)
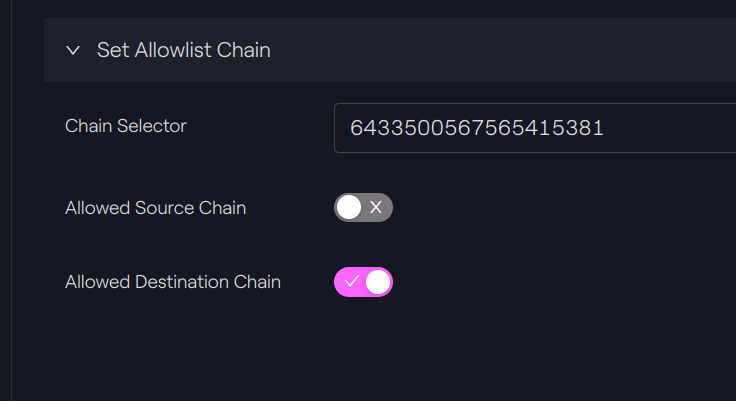
Polygon - Taurus-CAPITAL
Transaction: https://polygonscan.com/tx/0xd51c366ce185c651f66e594ff7d679b353c512038bf6
The configuration for the source chain is only useful if we use a receiver contract also, but this is not the case for the moment.
Activate fee tokens
We will now set the fee payment for our two senders contracts:
-
For Polygon, we will authorize to pay the fees in MATIC, the Polygon PoS native token
-
For Avalanche, we will authorize to pay the fees in AVAX, the Avalanche native token.
The selected ID for the native token is zero. The function has to be called on both blockchains:
changeStatusFeePaymentMethod(0, true);

Polygon - Taurus-CAPITAL
Transaction on Polygon: https://polygonscan.com/tx/0x706c2d552dba5b95a8f732755c0157329c803c467eff6f9d55152085833dc4a6
Transaction on Avalanche: https://snowtrace.io/tx/0x338895bd51007e1676a9872f009bed54dfa3f5a5341db1abd036f34d74d431d6
For a non-native token, we use another function:
function setFeePaymentMethod(IERC20 tokenAddress_, string calldata label_)
Authorize user to use the contracts
Our function transferTokens() from our sender contract is protected by access control. Only authorized user can use the function to transfer tokens.
grantRole(bytes32 role, address account)
grantRole(`b0f04d2e44f4b417ab78712b52802767b073e39f75dba9f6e3a31125b053f026`, <Sender address>)
In our case, we use the admin of the contract to call the function, which has by default the right to call the function.
Fund the sender contract
It is important to fund our sender contract to pay the fees. For that, we will call the function depositNativeTokens() with our account holding native tokens.
On Polygon:
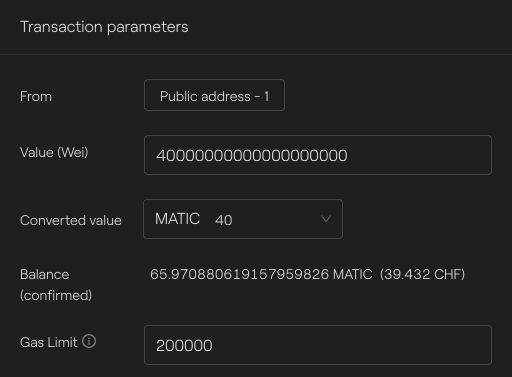
Polygon - Taurus-CAPITAL
Transaction: https://polygonscan.com/tx/0x626a56dfdb6c5c2dd455e34df2e20a78e3d7374aa417b1ac8c56bd70919e26f5
On Avalanche:
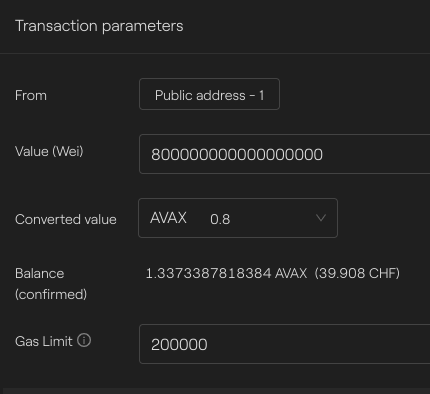
Avalanche - Taurus-CAPITAL
Approve the sender contract
With our bridge user, we have to authorize the bridge to transfer our tokens, here USDC tokens. This is done with the classic approve function.
-
On Polygon
Since USDC has 6 decimals, we put the value of 1000000

Polygon - Taurus-CAPITAL
Transaction: https://polygonscan.com/tx/0xe4fc399d659bb4aaecc75877913eefdeec5f70a8e222ada1511f2ed45fb44c6b
We can then check the allowance by calling the function allowance().
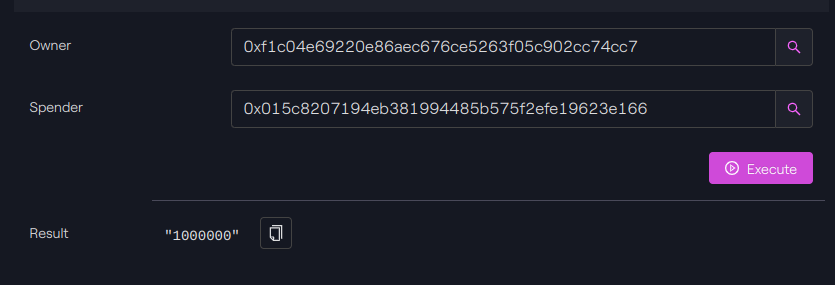
Polygon - Taurus-CAPITAL
We perform a similar task on Avalanche with the Avalanche USDC contract:

Avalanche - Taurus-CAPITAL
Transfer USDC token
We will use our transferTokens() function to transfer 1 USDC from Polygon to Avalanche.
Polygon
The arguments for the call are the following:
|
Argument |
Description |
|---|---|
|
6433500567565415381 |
Avalanche chain selector |
|
0xa279821bcb478ca3576b68368b0ca50224f2d485 |
Our receiver address on Avalanche |
|
0x3c499c542cEF5E3811e1192ce70d8cC03d5c3359 |
Token contract, in this case USDC on Polygon |
|
1,000,000 |
Amount of tokens to send. USDC has 6 decimals on Polygon, so here we transfer only 1 USDC |
The gas limit has to be enough to perform the call; we have taken 500,000 as gas limit.
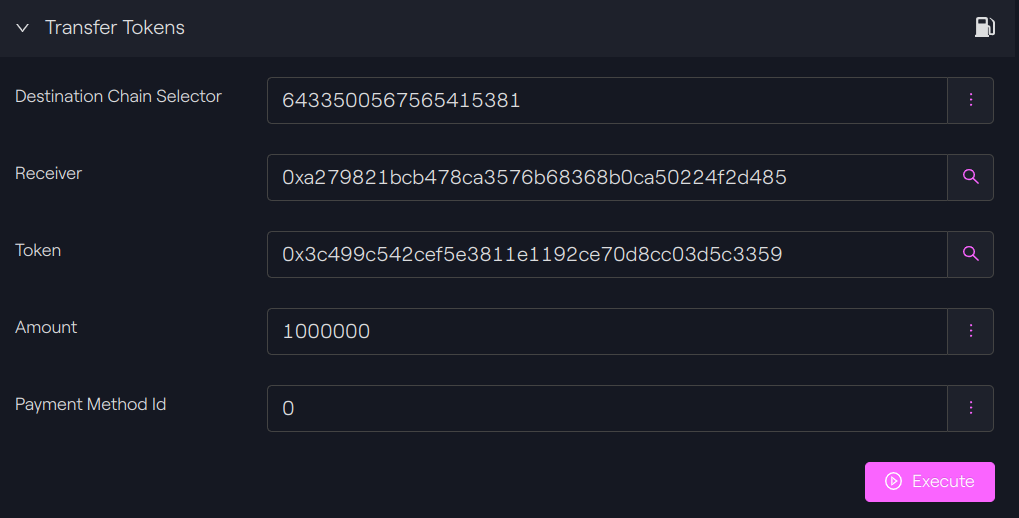
Polygon - Taurus-CAPITAL
Transaction: https://polygonscan.com/tx/0x9ca1740ae4c83075e1cd1821bf92be5cd4bf6db39c382ba27972b19f4513d857
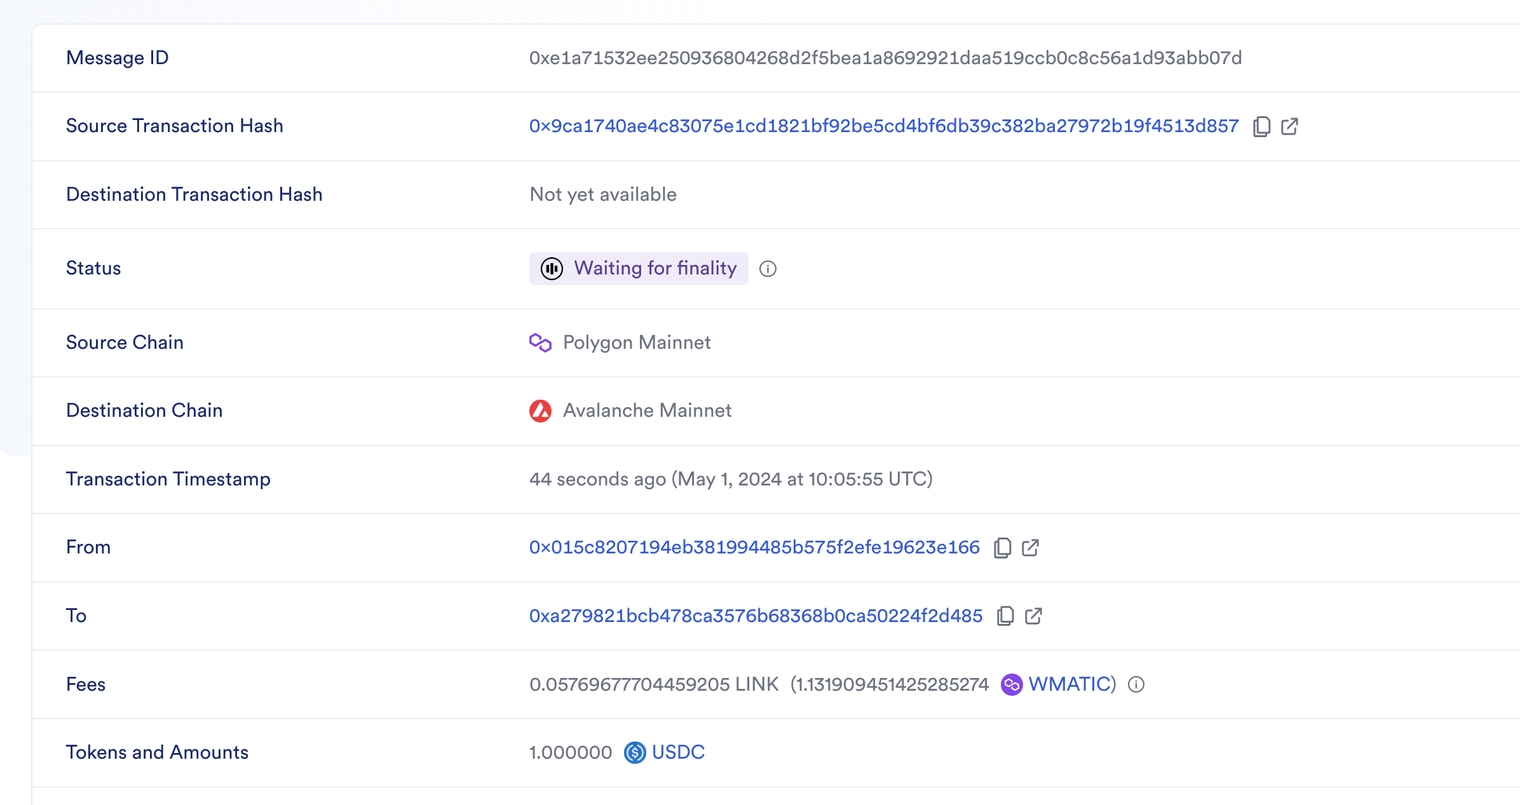
CCIP Explorer
You can then retrieve the transaction on the CCIP Explorer where you will see the different statuses.
The transaction passes the following step: Committed → Source finalized → Blessed → Waiting for finality → Success.
-
First step
-
The transaction is committed:

- The transaction is then blessed by the CCIP ARM:

This means that the Risk Management contract has approved the content of the transaction and "blessed" the committed Merkle root, which then becomes available for execution on the destination chain.
- Finally, the status is Success:

On Avalanche
On the destination chain, we can see in the transaction done by the bridge that 1 USDC has been transferred to our address 0xa279821bcb478ca3576b68368b0ca50224f2d485. See the transaction details on Snowtrace.
Since the model used is a burn-and-mint, the origin address is the zero address:

Avalanche - Taurus-PROTECT
Cost and time
-
In the transaction details on Polygonscan, we can see that the fee from the bridge was ~1.131 MATIC. With the transaction fee from the blockchain, ~0.698 MATIC, the total cost was 1.829 MATIC, or around $1.23, a relatively low cost that is negligible for larger amounts transferred.

- The time between the transaction and the success status on the CCIP explorer was about 15 minutes.
Avalanche
The arguments for the call are the following:
|
Argument |
Description |
|---|---|
|
6433500567565415381 |
Polygon chain selector |
|
0xf1c04e69220e86aec676ce5263f05c902cc74cc7 |
Our receiver address on Polygon |
|
Token contract, in this case USDC on Avalanche |
|
|
1,000,000 |
Amount of tokens to send. USDC has 6 decimals on Polygon, so here we transfer only 1 USDC |
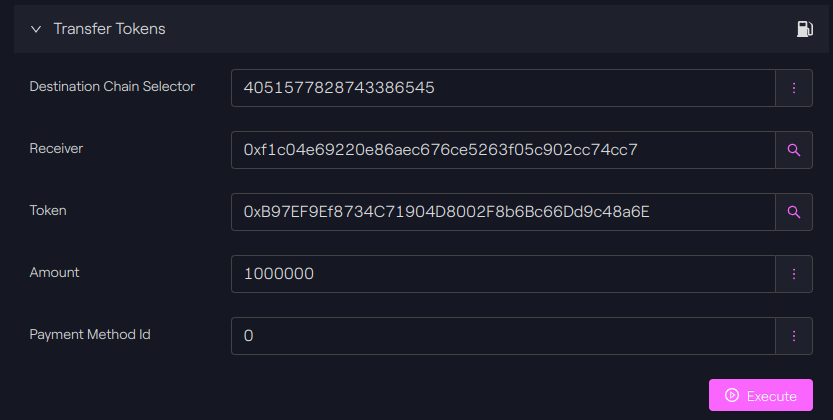
Avalanche - Taurus-CAPITAL
The transaction can also be seen on the CCIP Explorer, and on Snowtrace.
Conclusion
CCIP offers a good way to bridge tokens between different blockchains, but there are several requirements that can reduce the adoption:
-
The token has to be whitelisted by Chainlink, as router operator,
-
The blockchain must be also supported by the router contract.
When you use a bridge, there is still the risk that your transaction fails on the destination chain, causing you to lose your funds forever. The manual execution offers by Chainlink is a relevant feature to manage this.
If you are a token issuer, the alternative is to use the message system to lock tokens in the sender contract and send a transfer message to a receiver contract in the other side. Thus, the transfer is processed in the receiver contract and a transfer failure can be correctly handled.
To learn more about cross-chain USDC transfer, consul the following pages:
https://www.circle.com/en/multi-chain-usdc
https://chain.link/cross-chain
https://docs.chain.link/ccip/tutorials/usdc


